Sunset doesnt have to be the end of the day…

Although many photographers seek out the golden hours of the day, that first hour after sunrise, and the last hour before sunset for the appeal that the low light brings (good contrast, golden glow, deeper blue skies), with the advent of newer digital camera’s producing low noise at higher iso along with software that helps with processing of digital captures, train photography doesn’t have to end the moment the sun drops below the horizon.

For instance, both of the shots below were taken after sunset, but prior to darkness utilizing existing light, primarily to capture somewhat unusual power on the Joint Line here in Colorado.  The shots used similar but different approaches.

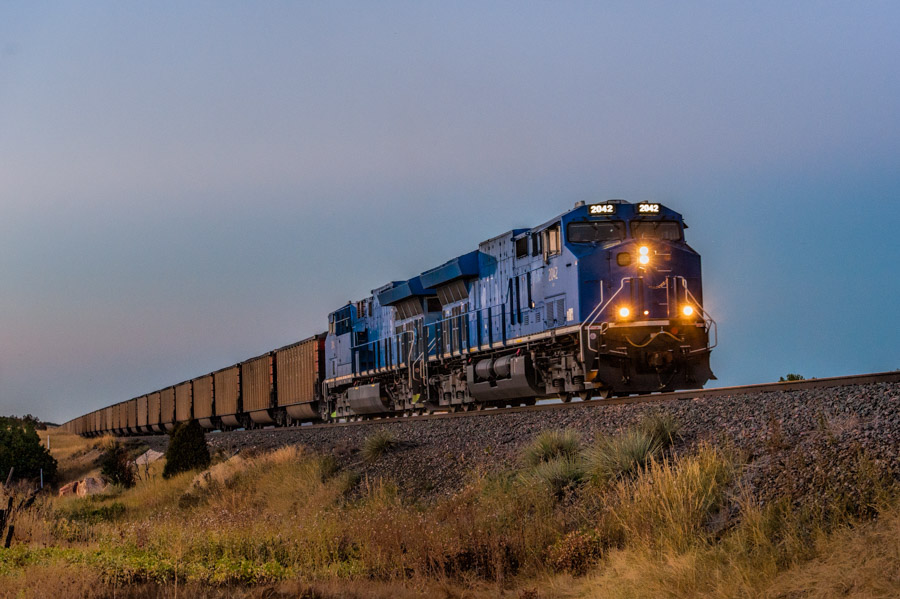
The first image, taken nearly 30 minutes after sunset, of GECX 2042 leading a train on Colorado’s joint line, utilized several techniques to capture a usable image, hardware (camera), multiple exposure, and software.

The hardware, or camera, is a newer model camera, a Nikon D700 (though no means brand new, the D700 represents technology about 5 years old) which has a full frame sensor known for producing low noise captures at higher iso.  Low noise is the key to photography in minimal light.  Camera’s that do not have good low noise performance at high iso will first experience noise in the darker areas of the image.  As with many instances, the lowest iso that can be used, in this case iso 1600, that can still freeze the motion, is probably the iso to use.  Higher iso than is needed will result in more noise, even in the best of low noise camera’s as iso’s become higher and higher.

3 exposures were shot of the train, taken in quick succession with the motor drive setting at high, with 3 shots taken.  1 shot was taken as my mid point exposure, plus 1 stop over and 1 stop under.  This was done with an eye towards utilizing an HDR approach to the shot, though is not a bad idea even if an HDR treatment is not intended.  Typically the sky will look better 1/2 to 1 stop under the exposure utilized for the locomotives, while the grasses in the foreground tend to look better 1/2 to 1 stop over exposed at this time of day.

With digital captures on the card, software finishes the job.  In my case, I utilize Lightroom for the initial file imports with a generic process applied to each image.  Once imported, the 3 shots were then opened for further processing with Photomatix, an HDR program.  In Photomatix, the images were combined using a less aggressive filter to minimize the HDR look.  Once reimported into Lightroom, Topaz clarity was then utilized to help finish the image, before some final image edits were made in lightroom, including very mild noise reduction.

The result is the image below.


RR-20150925-JointLine-76-Edit-Edit


The second image was shot 10-12 minutes after sunset, with a bit more light.  In this case an iso of 800 resulted in a 1/500th shot for the middle exposure, and again 3 shots were made with a 2nd shot 1 stop under exposed, and 1 stop over exposed.  Again, the Nikon D700 was utilized (being my normally used camera).

The same technique of using Photomatix to blend the 3 shots was used, though no final edits in Topaz clarity were used.

Again, a pleasant image resulted of the train, despite occurring after sunset (and of course without directly light).

RR-20150927-16


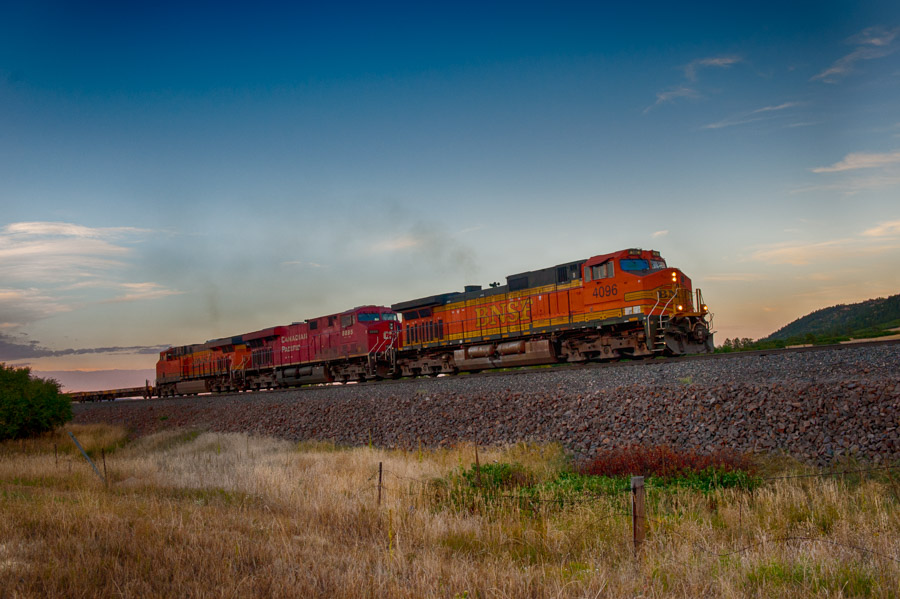
In both of these examples, the sun was camera left 60 degrees or so, resulting in skies that were less bright and more saturated.

With camera technology continuing to improve, less noise with high iso’s is becoming mroe common, making it easier to shoot after the sun goes down.

Watch those backgrounds!

Another tool in improving the look of your images is to carefully watch your backgrounds.  Pay particular attention to man made objects such as telephone poles, street lights, signs, cars, etc.  These can be very distracting to the image you shoot, and considerably take away from the composition and strength of the shot.

Many times, these distractions are easy to fix, if you are paying attention.  Moving 3-5 feet may allow an object to be hidden, or no longer be in the frame.  Or perhaps, crouching will allow the top of a pole or other tall item to be hidden by the train.  If not, perhaps a lower angle from a ditch, gully, or other spot below the right of way.  This technique will require shoot upwards towards the train as opposed to the more typical track side shot, but this type of angle can hide  many distractions.  For example, behind the shot below is a track side signal, easily hidden by the low angle.  Also, a major interstate highway is also on the opposite side of the tracks.  Had a more normal, at grade shot been made, or a shot with slight elevation above the tracks, not only would the signal likely be showing from behind the train, but an interstate highway with numerous vehicles would have easily been seen, very much distracting from the scene.  However, by going low, all distractions have been removed, with a clean sky behind the train, with attention to the subject matter, the train, considerably improving the shot.

RR-20120313-JointLine-5At other times, it may not be possible to remove the distraction by simply moving, or lowering your position.  Another technique that can work would be utilizing a longer focal length combined with a shallow depth of field.  Although this may cause less of the train itself to be sharp, attention can be focused on the area of interest with the train, typically a head on shot (though a broadside could still work with this approach), rendering the background blurry and not competing for the attention of the viewer.  Although the image below was not shot wide open at f2.8 or f4, the background still blurred with the utilization of the long lens (300mm), reducing some of the distraction behind the train.  A more wide open aperture closer to f2.8 would have maximized this effect.

RR-20090820-3

Yet another way to divert attention from a distracting background would be to utilize a wide angle lenses, particularly in the 16-20mm range.  Wide angle lenses result in the closer subjects being largest, and objects further away becoming quite small (the opposite of telephotos that compress the shot bringing in the background)..

So, to improve the results of your imagery, keep a careful eye on the backgrounds.  By carefully envisioning the shot, your images will significantly improve!


Edit Edit Edit

Perhaps one of the simplest ways to improve both the perception of your photographic ability, and to improve the actual images that you shoot, is to edit.  Editing what you show others, showcasing your better work, will invevtiably improve what other perceive your ability to be.  Editing the images you shoot also can improve your shots, by cropping dead space or clutter, removing minor imperfections such as dust spots, improving contrast, tweaking (though not massively changing) saturation and clarity, and sharpening, all enhance your digital images.  In fact, if you shoot in RAW format, then you must edit or your images will appear flat and lifeless

With the advent of digital photography, and its widespread acceptance and use by most current day photographers, the ability to edit your images has been streamlined since the days of chemical dark rooms, with a number of software packages available at a relatively low cost.  Several of the more popular editing software includes, Adobe Elements (street price approximately $70), Adobe Lightroom (street price approximately $149), and Adobe Photoshop  (street price approximately $200 though varies considerably by version), with other programs available as well.

If shooting raw, at a minimum an adjustment should be made to contrast, sharpness, and color saturation.  In all cases, be careful not to over do any of the adjustments, or the image will begin to look artificial.  Other typical edits might include dust spot removal, black level adjustment, color balance correction, and exposure adjustments.  All of these adjustments help the overall look and feel of your image, important not just when showing your images to others, but also for your own edification and viewing enjoyment.

Another edit that should be considered for some if not many images, is cropping of the image to enhance the subject, and to remove dead space or distractions.  Dead space is simply large areas which do not add to the image, perhaps too much sky, or foreground (though dead space typically refers to areas behind the subject.

Here is an example of reducing dead space through cropping.

Before cropping                                                                         After cropping

The image on the left shows the full frame image, and although not a bad composition, has a bit too much space towards the front of the engine, as well as a large amount of sky.

The second image reduces amount of sky, and tightens on the subject.  Although the relay box is cropped down the middle (the small structure to the right of the signal), this edit does not hurt the overall composition, with a more balance and powerful image resulting from the crop.   Notice also, that this was a small crop, not an extreme crop. Naturally, how each photographer crops an image varies by one’s own style and preference.

If shooting .jpg format, less overall editing is typically performed, as the conversion to .jpg involves a number of adjustments that made by the software built in to the camera.  However, some editing can still be done, and naturally any edits relating to cropping are not affected by raw versus .jpg.

In addition to editing of individual images as described above, one of the best ways to improve what other photographers think of your work is to edit what you what images are shown to others.  Unless particularly newsworthy, and not already posted by others, pick only your best work , both in terms of composition, and technical details such as exposure, sharpness, and contract.  By being more selective in what you share, and post, others will think more highly of your work.  A careful look at many rail related websites will highlight this, those photographers thought of as “good” will typically carefully pick what images they show others, while other photographers post images with little regard to quality.  Think before you post, 1 well composed image is of more value to others than 5 or 10 poorly exposed, out of focus, visually uninspiring photos.

To quote Joe McNally, “The best photographers are the best editors”.

Your image, and the image you want to share to others, freqently is in the editing… edit, edit, edit!

Some people have all the luck…

We have all heard the phrase “That was a lucky shot”, or “Was he ever lucky in getting that shot”.  Sure, there are the occasional lucky shots, the random act of simply putting your eye to the view finder and pushing the shutter, with little or no regard to lighting, composition, focus, shutter speed, or aperture.

If true random luck was responsible, why then do some photographers seem to have all the luck?  And others, no luck at all.  Perhaps something other than luck is really going on.  The Roman philosopher Seneca said in the mid 1st century AD, “Luck is what happens when preparation meets opportunity”.  This simple quote can fit many instances in life, business, sports, education, and most certainly photography.

Preparation in photography would begin first and foremost by knowing your camera; how to adjust the settings, how to set the focus point, and if available, when and why to use each type of focus (manual focus, various auto focus types) , using aperture versus shutter versus manual modes (your not totally letting the camera make all the decisions, are you), iso setting, single shot mode or motor drive, the list of settings for modern dSLRs is nearly endless, and even point and shoot camera’s have a number of settings.  The point being, increasing your chances for that “lucky” shot begins with knowing what your equipment can do, and how to set it.  Tripods, strobes, scanners, gps, laptop software, all have a learning curve that can impact your ability to use the equipment you have.

Beyond the camera, know the line where you are shooting is invaluable.  Which side of the tracks do you want to capture a particular scene, is morning versus afternoon better (and no, you do not need to be shooting from the sunny side to make a good image, but the light, and how it interacts with the scene, varies though out the day, and season to season), where do I exit to get to a spot, how long does it take to drive from one spot to another, when do the trains typically operate.  This type of understanding will go a long way to assist in your photography, and yes, there is a certain “home” advantage to photographer’s shooting lines they know and frequent.  Despite this advantage, many resources exist to study a distant line prior to a visit.  Google Earth is invaluable in getting a feel for the area, online information and forums abound (don’t be afraid to post a question, almost certainly some railfans will step up and assist with information).  And once arriving on location, take some time to scout out your locations prior to the headlight looming down the tracks.

Beyond the knowledge of your equipment, and the line your shooting, having an idea photographically of what you wish to capture will greatly enhance your ability to get that lucky shot?  Shooting the 3/4, full sun shot is great, but many other photographic possibilities exist.  Pan shots, glint shots, silhouette’s, broadsides, verticals, high angle, low angle… the ways to photographically compose railroad images is limited only by your imagination.  But whatever your photographic style becomes, it helps to think about what type of shot your after, prior to raising the viewfinder to your eye.

As to opportunity, you need to place yourself in situations to take the images in the first place.  Track side prior to sunrise, after sunset, in the early light, in the setting sun, in the snow, in the rain, in clear skies or fog, in the mid day light perhaps, but to improve your chances, the more often you are out shooting, the more often you find unique angles, or lighting, or perhaps find a rare movement.  Yes, the opportunities will present themselves, and are endless, for those that seek them,

The late Dave Thomas, founder of Wendy’s, said, ” the harder I work, the luckier I get”.

Luck, hardly!


Welcome to the new Railroad-Photos.com

Welcome to the newly revised railroad-photos.com!  This site will showcase images largely taken in and near Colorado, primarily from the digital photography era, though some older scanned slide images will be included.

In all cases where a digital camera was utilized, the date, camera model, lens setting, shutter and aperture information will all be included below the image.

9 galleries are included at this point.

1st, Colorado Joint Line is show cased.  This line runs between Denver, CO and Pueblo, CO.  Running through my home town in Castle Rock, this line is easy to access with abundant images regularly taken on the line.

2nd, the Moffat Line running out of Denver is shown.  The images on this section are largely taken between Denver and Pinecliff, though some images further west are included.

The third gallery shows the Abo Canyon area, taken on a trip in April 2005 prior to the start of reconstruction on the line.  Since that time, access has been limited, though hopefully with the completion of the line, additional images will again be possible showcasing the now double track line

A fourth gallery features the Twin Peaks Sub, running north from Des Moines, NM to Trinidad, CO.  This line, now largely limited to northbound movements, has abundant photographic possibilities, with a number of horseshoe curves, rugged scenery, and vertical curves.

The fifth gallery shows images taken on the Powder River coal line in 2004 and 2006.  Additional trips resulting in new images are hoped for later this year.

The sixth gallery shows Crawford Hill, NE, another coal line upgraded since the coal boom with a large volume of trains.  These were taken on the property of Ponderosa Ranch, a bed and breakfast that welcomes railfans.  Although only 1 trip has been made to the ranch, I highly recommend this bed and breakfast, and location, to all railfans.

The seventh gallery showcases the Cane Creek Sub, near Moab, UT, a personal favorite of mine.  A number of trips have been made and are showcased in the gallery.

The eighth gallery includes steam images taken in Colorado since 2004.  Colorado features a number of operating steam locomotives, many of which run in great, mountain locations.

Finally, some older images take from the 1970s in northern New Jersey are included.  It is hoped that additional, older images can be scanned and posted.  These are all slide images that have been scanned.

In addition to the gallery images, it is planned for the blog to discuss railroad photography and technique (to reply to a blog entry, click on the blog title at the top of the blog posting).  It is encourage that readers of the blog respond to blog posting, and feel free to ask railroad photography questions.

Tim –